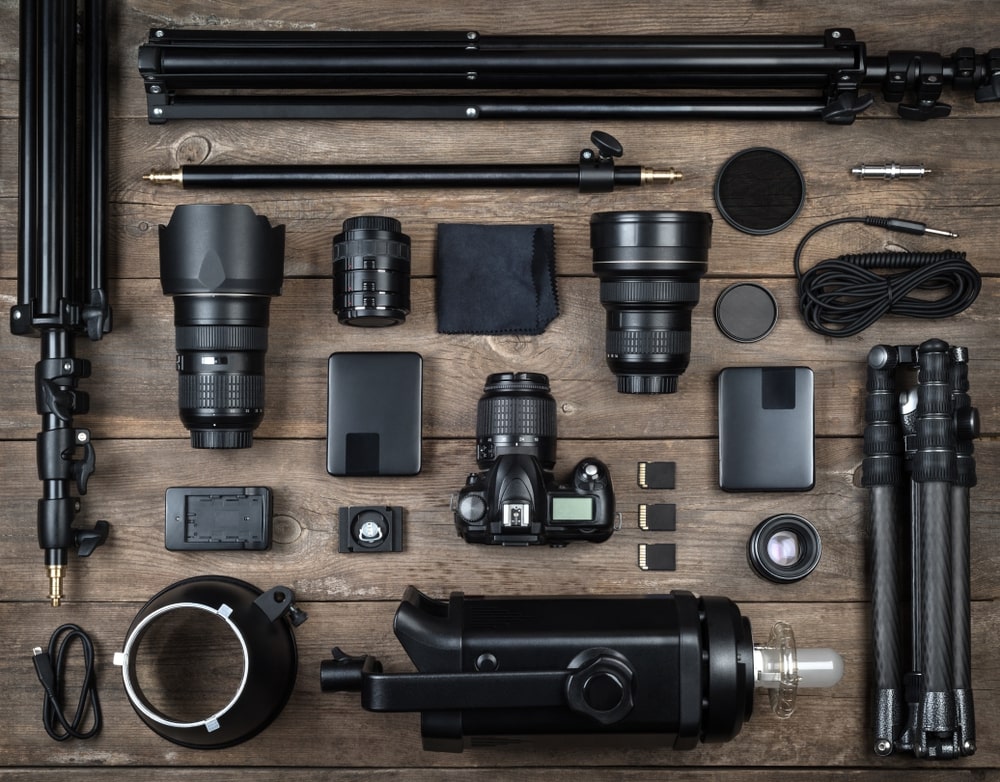
The accessories that go with your camera make it great. These accessories include filters, external flash, and a tripod. These accessories all improve the quality of your photographs, so make sure they are included in your kit. You will want to buy polarizers if you're a professional. Polarizer filters can be used to block certain wavelengths, resulting in more saturation and deeper colors. They're cool too, so they should be a part of your photography kit.
Reflectors
A reflector is an accessory for your camera that adds more light to your subject. You can find it in many sizes, shapes, or colours. Many reflectors include handles for ease of handling. Some are even made to stretch over metal frames. These accessories can be used for many different photographic techniques.
There are many sizes and shapes of reflectors. You should select the size that best suits your needs, depending on what type of photo you are taking. The smaller, 80-100cm-sized reflectors are perfect for portraits and interiors. Larger reflectors can be used to diffuse light across a larger area. These are however heavier and more difficult transportable.
Filters
While digital cameras are now capable of capturing high-quality images, you might need to use a filter to balance out the exposure. Graduated neutral density filter, for instance, allows you to adjust the amount that light passes through a scene. This will allow for you to benefit from a variety of lighting conditions without needing Photoshop or other software.
The most basic filters are ultra-violet (UV) filters and skylight filters. These filters are made from glass and may be coated with simple anti-reflective coatings. Even if your lens doesn't react to ultraviolet light very much, UV filters can preserve the sharpness and clarity of your photos.
External flash
An external flash, a camera accessory that provides extra lighting for your photos, is an external flash. External flashes offer a greater level of power than the built-in flash. They can also be used to bounce light off objects within your frame. This eliminates shadows often caused by direct flashes.
An external flash can be one of your most valuable camera accessories. This can significantly improve the quality and appearance of your images. The result is flat lighting without depth when the flash is pointed directly at the subject. This increases the chance of red-eyes, glare and other problems.
Tripod
A cheap tripod can be used to hold your DSLR or mirrorless camera with kit lens. However, it won't suffice if you need to add additional accessories to your kit such as flashguns or LED lights. Also, a tripod that isn't heavy enough will make it difficult for you to carry your camera. It's expensive, but you can get better photos with a carbon fiber tripod.
A tripod can be purchased online. However, you need to ensure that the tripod is made of strong, lightweight materials. A tripod that is cheap and fragile can easily fall apart if it's moved or tilted. It should also be capable of holding your camera at an eye level. This allows you to take photos closer to the ground. A tripod that locks together with legs, such as a twist lock or clip lock, is a good choice. This is easier to transport when you are on the move and will take up less space.

Memory card reader
The best method to download images or videos from memory cards is using a memory-card reader. This reader is safe and easy to use to transfer data to your computer. It does not require any complicated electronics, and it can be replaced easily if you need to. Card readers don't consume any power. If the battery goes out, you don’t have to worry that your photos will be lost or run out.
Memory card readers come in three basic types. Single memory card readers only can read one card type, while multiple memory cards readers allow for multiple card slots. The third type, a series card reader, has multiple slots that can handle the same type memory card.
FAQ
Which Lenses Do I Need?
The most frequently asked question by beginners is "What lens should i buy?" This is a difficult decision because there are so many options.
There is good news: You don't need to buy new lenses every time you buy a new camera. Instead, you can add lenses later on.
Here are three types of lenses to start with.
-
Wide Angle Lens (14mm-24mm): These lenses offer a wide field of view that allows you to capture more detail. You can zoom in, but not lose image quality.
-
Normal/Standard zoom lens (28mm -70mm). These lenses allow the user to adjust focal lengths while still maintaining good image quality.
-
Telephoto Zoom Lens (70mm, 200mm): These lenses work well for distant subjects. They let you focus on your subject even though they appear small in the frame.
These lenses can be combined to create different effects. You can use a normal lens for close-up detail and switch to a zoom lens to capture distant objects.
What is the rule for thirds in photography?
The rule to thirds is a great way to create interesting compositions. It divides your image into nine equal parts, horizontally and vertically. This creates three main areas for your subject to appear. These are the top and middle thirds (in the upper left corner), as well as the bottom and lower right. These areas are useful for positioning your subject in your frame.
The rule of Thirds helps you avoid placing crucial elements too close together. You might not have enough space between them for a strong visual impact if you put them close together. They may lose focus if they're too far apart.
Should I begin photography as a hobby.
Photography is a wonderful way for you to capture your memories and share them. It also allows you to learn more about the world around you.
If you are interested learning how to take better photos, there are plenty online resources that can help.
It may be worth looking into classes at community colleges and art schools. This gives you the opportunity to meet other photographers, who can offer valuable feedback.
How can I become a professional photographer?
Photography is an art that takes patience, dedication and passion. If you love photography, you'll be doing better than if only you were going after the money.
It is essential to understand how to use your camera effectively. Understanding composition, lighting, exposure and depth of field are all important. Also, you will need to be able to use Photoshop.
It is hard to master photography, but it is worth the effort.
If you want to improve your skills, then read books on the subject, attend classes and take part in competitions. This way, you will gain experience and confidence, leading to improvement. What equipment do I need?
It all depends on what type photography you do. If you are interested landscape photography, you will need to have a wide-angle zoom lens.
A telephoto lens is essential for portrait photography.
When taking photos, a tripod is essential. You can stand back and compose the picture, without having to move.
Camera bags are great for carrying your accessories, such as memory cards and cameras.
If you are using a compact lens, a flash is needed.
A DSLR (Digital Single Lens Reflex), camera is the best choice for novice photographers who wish to create professional-quality images.
DSLRs are highly popular for their ability to control every aspect of a photo, such as shutter speed and aperture, ISO sensitivity, white-balance, focus, and white balance. There are many features available, including autofocus, self-exposure lock (auto-exposure lock), bracketing, and RAW format.
How can I make my photos look beautiful?
The best way to ensure you look good in photos is to take them yourself. You'll learn how you pose for the camera and which angles are best. Learn how to use lighting, props and other tools to enhance your natural beauty.
You'll discover how to choose clothes that fit well, make-up that looks great on you, and hairstyles that suit your face shape and style.
We will also help you retouch your images using Photoshop or another editing software, if you are not satisfied with the results.
Don't be afraid to take some self-portraits.
Do I Need A Tripod?
This is one those questions that everyone has to ask. The truth is that a tripod isn't always necessary, but it can come in handy.
It helps you keep your camera steady while taking pictures at slow shutter speeds. A tripod is a great option for landscapes and other stationary subjects.
However, using a tripod to photograph moving subjects like people or sports can result in blurriness. So, how do you know which situations require a tripod?
A tripod is useful when you need to photograph stationary or fast moving subjects. Examples include:
-
Sports
-
People
-
Landscapes
-
Close-ups
-
Macro shots
You can use this test to determine whether you need a tripod. Keep your camera still, and then look through the viewfinder. If blurred lines appear or you feel movement, you will definitely need a tripod.
If you don’t see blurring, adding a tripod is unlikely to make any difference.
If you do decide on a tripod purchase, these are some things to remember.
-
Make sure your tripod has smooth legs. This helps to prevent vibrations from shaking the camera.
-
You should choose a sturdy tripod. Some tripods can be made out of plastic but they are not very durable. Instead, choose a metal tripod.
-
You might consider purchasing a remote control. This remote control lets you remotely control your camera. This allows you to set the shutter to automatically fire when you press it.
-
Try to find a tripod with a head that rotates 360 degrees. This allows you to place your camera horizontally and vertically.
-
Keep in mind that tripods aren't cheap. Expect to pay around $100-200. However, you'll get a lot of value for your money.
-
Accessories like memory cards and filters should not be forgotten.
-
Before ordering online, you should check in your local shops. Many retailers offer free shipping.
-
Check out customer reviews to learn what they think about a product.
-
Ask your family members and friends to recommend similar products.
-
To learn more about customer experiences, you can visit forums and message board.
-
Find user reviews online.
-
Use websites like Amazon.com to compare prices and read customer feedback.
-
Check out these photo galleries for an example of the work that photographers do with their tripods.
Statistics
- There are people out there who will pick at flaws they can only see in 100% crops of your photos. (wikihow.com)
- By March 2014, about 3 million were purchased monthly, about 30 percent of the peak sales total. (en.wikipedia.org)
- Get 40% off Adobe Creative Cloud(opens in new tab) (creativebloq.com)
- That's the easiest way to get blurry photos 100% of the time. (photographylife.com)
External Links
How To
How to take photographs in low lighting conditions
Low-light photography refers to taking photos in dimly lit or dark environments. It requires special equipment. Controlling exposure, white balance, sharpness, and contrast are the main challenges. Two types of low-light photography exist: ambient or flash. Flash photography works best when there's enough light around. A flash is required if there isn’t enough light. For example, if your subject is indoors but outside, there might not be enough light to capture a good picture without a flash. If you don't want to use a flash, try shooting at night during the moonlit hours. This will give you some beautiful shadows and colors. Another option is to shoot during twilight. Twilight happens when the sun has set but there is still daylight.
Also, you might want to try long exposures. Long exposures allow you to record images after the shutter has been open for several minutes. The shutter must be closed so that the camera only records light that hits the sensor. The light that falls onto the sensor during a long exposure continues to be recorded. But, the shutter remains closed and no new light enters. You will see very little movement as a result. To ensure you're getting a clear image, turn off any automatic settings like autofocus and auto exposure. You should also adjust the ISO setting prior to you start taking photos. An ISO setting of 200 gives you more flexibility to control how bright or dark your image looks. Once you are ready to click the shutter button, make sure it is fast. The shutter will close completely. Keep the shutter button pressed down until the last second. To prevent additional light entering the camera, hold the shutter button down. Once you have taken your picture, wait for a few moments before you release that shutter button. This will allow the camera to process your image. While the image is processing, you can see your photos on your computer monitor. When you are happy with your photos, save them to the computer.