It is possible to enhance the perspective of a photo by adding depth to it. There are a few different ways you can do this. You can also use a large aperture in order to reduce the focus. This will give the image more depth. To create a 3D effect, you can adjust the focus of your image.
Light
Good photographers use light to give photographs depth and separation. Focusing the light on the subject is one way to achieve this effect. There are several ways to create this effect. For example, you can use a strobe or reflector to bounce light into the subject's face or hair. A good way to add depth to a photo is to use the sun's light as backlighting.
The distance between the subject in a photograph and its lens will influence the DOF. The DOF of a photograph will decrease the closer it is to its subject. Conversely, a photograph of a distant subject may have a wider DOF.
Shade
Depth is a subjective perception that comes from the way light and shadows interact. The darker a surface appears, the closer it is to its source of light, and the brighter it will look, the further away it is. This contrast helps the viewer perceive how an object feels.
The horizon line, as well as other techniques, can be used to manipulate depth. A strong horizon line will bring the object closer to the viewer. A stronger line will appear closer while a shorter line will appear further away. Using outlines and shadows to separate objects will add to the illusion of depth.
Aperture
The aperture, or fstop in photography, is the amount of light that will pass through your camera. This can affect the depth and field. This is an important compositional and creative element for any photograph. The lower the focal length, the smaller the depth of the field. A higher f-stop, on the other hand, will result in a sharper background and a deeper field.
The smaller the aperture the more light is focused on the subject. The larger the aperture, you will see more detail of distant objects.
Sensor size
A camera sensor's number of pixels can have a significant impact on the quality of an image. The sensor size can have an impact on the depth or width of the field. A smaller sensor will often provide a shorter depth of field than one that is larger. However, if you have a larger sensor you can simply crop it.
It is essential to choose the right size sensor for high-quality images. A larger sensor will produce better images and offer a wider dynamic range. However, it also means that you must use larger lenses and housings, which can be inconvenient in some situations.
Circle of confusion
Photographic depth of field is an essential part of taking a good photograph. A photograph's sharpness depends on the distance between the subject and the point of light in the image. The focus is on the point of the light, and the background lights are out of focus. By using a wide aperture, you can capture this effect easily. The result will be more pleasing overall.
A large depth will produce a large amount of sharpness. However, a shallow depth will only produce a small amount of sharpness. The first step in maximising your photographs is understanding depth of field. Understanding the circle of confusion will help you understand depth of field. The circle of confusion, an indistinct circular area created by the lens and which represents an out of focus image of one point, is an indistinct circle. This area appears sharp when it is small.
FAQ
What Camera Should I Get
This all depends on who you want as a photographer. A basic point-and-shoot camera is probably all you need if you're just starting out.
Once you have mastered the basics you will likely need something more advanced. The choice really comes down to personal preference.
These are some considerations before you purchase a camera.
-
Features: What features do you need? Do you plan to use manual settings, autofocus, or both? What number of megapixels does the camera have? Is there a viewfinder?
-
Price: How much money are you willing to spend? Are you planning on upgrading your camera every two years?
-
Brand: Do you feel satisfied with the brand you choose? There is no reason you should settle for less.
-
Functionality: Can your camera work in low-light conditions? Are you able to take high-resolution images?
-
Image Quality: How clear, sharp, and crisp are your images.
-
Battery Life: How long can your camera last before it needs to be charged?
-
Accessories: You will be able attach additional lenses, flashes and other accessories. ?
What makes a good camera bag?
Because it protects your equipment while you are traveling, choosing a camera backpack is crucial. These are some important things to keep in mind as you choose a bag.
-
Size: Choose a big bag to hold your camera and accessories comfortably. You shouldn't buy more than what you actually need.
-
Durability: Choose bags made from durable materials like leather, canvas or nylon. Avoid using plastic bags or fabric bags.
-
Protection: Make sure your bag provides protection against dust, dirt, moisture, and scratches.
-
Organization: To make it easier to find what you need, organize your gear according to type. You could, for example, place your lenses in one area, your memory card in another and your battery charge in yet another.
-
Comfort: A shoulder strap is a better choice than a handbag for shooting. You should also look for a design that is comfortable and has padded straps.
-
Price: Shop around to find the best price. You may find some brands that sell their products at a discount price, which is a great bonus.
-
Warranty: Ask if the company offers a warranty on its products. If your bag is damaged or lost, this will let you know who to contact.
What can I do to learn photography?
There are many ways you can learn to take great pictures. You have many options. You could purchase a book or attend a class. Or you could join an online group. There's no better way to learn the art of photography than by doing it yourself. This way you can control what goes into each photograph. As long as you continue learning, you will always be improving.
In fact, one of the best things about digital photography is that you don't even need expensive equipment. All you need is an internet connected computer and a camera. The rest is up to you.
Here are some ways to get started.
-
Familiarize yourself with the manual settings for your camera.
-
Learn the basics of how to use these controls.
-
Photograph lots.
-
Modify them.
-
These should be shared.
-
Keep practicing.
-
Experiment.
-
Take a look at the world from different perspectives.
-
Use light sources creatively.
-
Practice makes perfect.
-
Don't be afraid to fail.
-
Be patient.
-
Have fun!
Do I Need A Tripod?
This is one question that everyone wants to know. While a tripod isn’t necessary every time, it is useful.
It helps you keep your camera steady while taking pictures at slow shutter speeds. Tripods can be a huge help when you are shooting landscapes or stationary subjects.
However, using a tripod to photograph moving subjects like people or sports can result in blurriness. How do you decide which situations are best served by a tripod.
A tripod is useful when you need to photograph stationary or fast moving subjects. Examples include:
-
Sports
-
People
-
Landscapes
-
Close-ups
-
Macro shots
If you're unsure whether you need a tripod, try this test. Take your camera and hold it still. Then, look through the scope. If you see blurred lines or movement, then you definitely need a tripod.
A tripod won't make any difference if there is no blurring.
These are just a few tips to help you decide whether or not to purchase a tripod.
-
Your tripod should have smooth legs. This prevents unwanted vibrations from shaking your camera.
-
Use a sturdy tripod. Some tripods are made out of plastic and may not be very durable. Consider a tripod made of metal.
-
You might consider purchasing a remote control. This remote control lets you remotely control your camera. Once you press the button, it will automatically fire the shutter.
-
Try to find a tripod with a head that rotates 360 degrees. This makes it easier to position your camera vertically or horizontally.
-
You should keep in mind that tripods don't come cheap. Expect to pay between $100-200. However, you'll get a lot of value for your money.
-
Don't forget accessories such as memory cards or filters.
-
Before ordering online, you should check in your local shops. Many retailers offer free shipping.
-
Review a product to find out what other customers think.
-
Ask your family members and friends to recommend similar products.
-
You can learn from customers' experiences by visiting message boards and forums.
-
Search online for user reviews.
-
Amazon.com is a website that allows you to compare prices and get customer feedback.
-
Check out these photo galleries for an example of the work that photographers do with their tripods.
Statistics
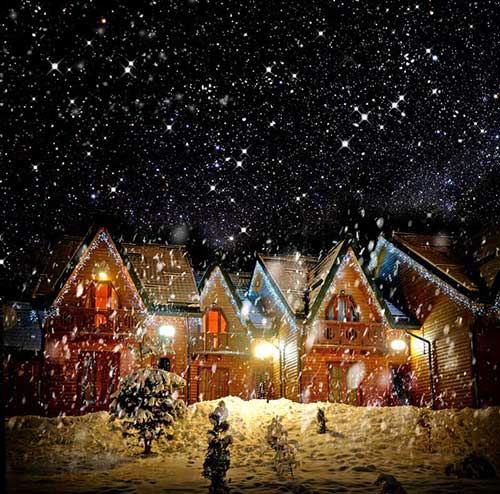
- While I cannot prove that all of those spots were not sensor dust, the photo was taken during a heavy snowstorm…so I guess that 99.8% of the spots are snowflakes. (bhphotovideo.com)
- This article received 13 testimonials, and 100% of readers who voted found it helpful, earning it our reader-approved status. (wikihow.com)
- Get 40% off Adobe Creative Cloud(opens in new tab) (creativebloq.com)
- The second easiest way to get blurry photos 100% of the time is to use a cheap filter on the front of your lens. (photographylife.com)
External Links
How To
How to take photographs in low lighting conditions
Low-light Photography is when you take photos in dimly lit or dark environments. It requires special equipment. Controlling exposure, white balance, sharpness, and contrast are the main challenges. Two types of low-light photography exist: ambient or flash. Flash photography works well when there is sufficient light around you. A flash is required if there isn’t enough light. Without a flash, it is possible to get a poor picture if the subject is indoors and not outdoors. If you don't want to use a flash, try shooting at night during the moonlit hours. This way, you'll get some nice colors and shadows. Another option is taking photos at twilight. Twilight happens when the sun has set but there is still daylight.
Long exposures may be something you want to explore. Long exposures enable you to take images even after your shutter has been open for several seconds. When the shutter remains closed, the camera records only light that falls on the sensor. This light will continue to fall onto your sensor after a long exposure. The shutter is still closed so no light can enter the lens. Therefore, there is very little movement. You can ensure clear images by turning off automatic settings such as autofocus or autoexposure. Adjust the ISO setting before you start to shoot. An ISO setting 200 gives you more control over how bright or dim your image appears. Next, click quickly on the shutter button to capture the shot. This will cause the shutter to close completely. Hold the shutter button down for the final second. You can prevent any additional light entering your camera by holding the shutter button down. After you've taken the picture, wait a few seconds before releasing the shutter button. This will allow the camera to process your image. While waiting, you can check out your photos on your computer screen. Once you're satisfied with them, save them to your computer.